How To Make A Mason Jar Terrarium: All You Need To Know
Are you looking for a creative way to add greenery to your space? Look no further than the mason jar terrarium! This DIY project is fun and easy to make and brings a touch of nature into your home or office.
You can create a miniature garden inside a clear glass jar with just a few simple materials and some creativity. Now the question is how to make a mason jar terrarium.
To make a mason jar terrarium, you’ll need to fill a mason jar with potting soil, add small plants and decorative items like rocks, moss, and figurines, then water the terrarium and enjoy.
In this guide, we’ll walk you through step-by-step instructions for creating your mason jar terrarium so that you can add a bit of natural beauty to your space.
Benefits Of Making A Mason Jar Terrarium
Mason jar terrarium is a miniature garden enclosed within a glass jar. These terrariums are easy to create and offer several benefits to garden enthusiasts and those looking to add greenery to their homes or offices.
Here, we will discuss the benefits of making a mason jar terrarium.
Low Maintenance
Mason jar terrariums are low maintenance and require minimal care. These gardens are self-sustaining ecosystems, and the moisture and nutrients are recycled within the terrarium. The closed environment of the terrarium also means that the plants inside do not require frequent watering or fertilization.
Enhances Indoor Air Quality
Plants play a crucial role in improving indoor air quality. They absorb carbon dioxide and release oxygen, which helps to purify the air. A mason jar terrarium is an excellent way to add greenery to your indoor space and improve air quality.
Creative Outlet
Creating a mason jar terrarium is a fun and creative activity. You can choose from various plants and materials to design a unique garden that reflects your personality and style. You can also experiment with different pebbles, rocks, and moss layers to create a visually appealing terrarium.
Easy to Make
Mason jar terrariums are easy to make, and you do not need specialized gardening skills to create one. You only need a few materials, such as a glass jar, soil, pebbles, rocks, and plants, to get started. You can find these materials at your local garden store or online.
Versatile
Mason jar terrariums are versatile and can be created in various shapes and sizes. You can use different types of plants, such as ferns, succulents, or cacti, to create a terrarium that suits your preferences. You can add decorative elements such as figurines, colored pebbles, or sea glass to make your terrarium unique.
However, if you don’t know how closed terrarium works, you should know about that. This will help you to make the mason jar terrarium successful.
How To Make A Mason Jar Terrarium
Mason jar terrariums are a fun and easy way to bring a touch of nature indoors. These miniature gardens are not only beautiful to look at but also require very little maintenance, making them a great addition to any household. Here’s how to make your very own mason jar terrarium:
Materials Needed
- A glass jar (a mason jar works great)
- Pebbles or rocks
- Charcoal
- Potting soil
- Ferns or other plants
- Moss (optional)
- Water
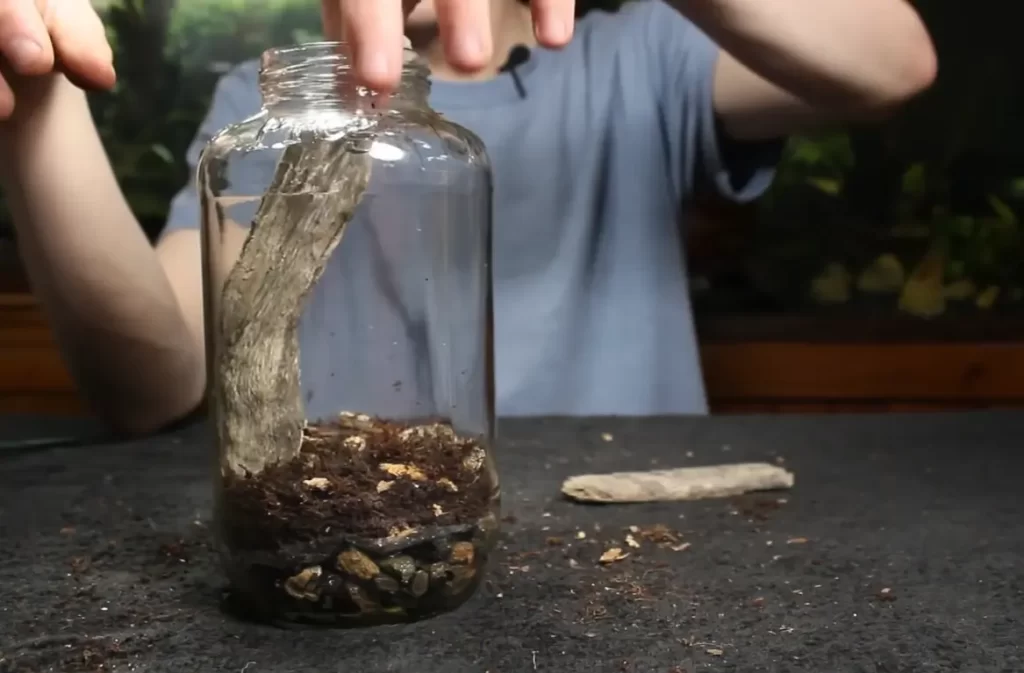
Step 1: Prepare Your Materials
Before assembling your terrarium, gather all the materials you’ll need. Ensure your glass jar is clean and dry. Choose plants suited for terrariums that will fit in the jar without overcrowding. You may also consider adding decorative elements such as colored pebbles or sea glass.
Step 2: Create a Drainage Layer
To prevent water from accumulating in the bottom of your terrarium, create a drainage layer by adding a layer of pebbles or rocks to the bottom of the jar. This layer should be about 1–2 inches deep.
Step 3: Add Charcoal
Adding a layer of charcoal on top of the pebbles helps keep the terrarium fresh by absorbing impurities and preventing odors. This layer should be about ½ inch deep.
Step 4: Add Potting Soil
Add a layer of potting soil to the charcoal, filling the jar about 2/3 full. Make sure the soil is level and not too compacted.
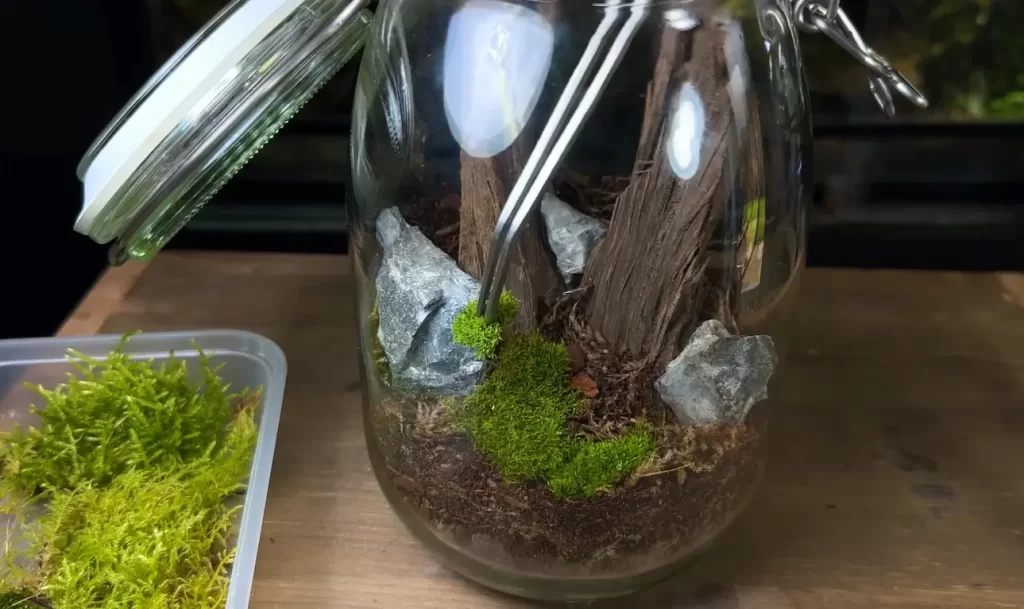
Step 5: Add Plants
Now it’s time to add your plants. Dig a small hole in the soil for each plant and place it in the hole, gently packing soil around the roots. You should ensure the plants are evenly spaced and not too close together.
Step 6: Add Moss (Optional)
For an extra touch of greenery, you can add a layer of moss on top of the soil. This will also help retain moisture in the terrarium.
Step 7: Water Your Terrarium
Once your terrarium is assembled, give it a good watering. Be careful not to overwater, as mason jar terrariums are closed environments, and excess moisture can cause issues with mold and mildew. Check on your terrarium every few days and water as needed.
Step 8: Enjoy Your Miniature Garden
With proper care and attention, your mason jar terrarium will thrive for months. Place it in a well-lit area away from direct sunlight, and watch as your tiny garden grows.
Ideas for Plants Suitable for a Mason Jar Terrarium
Mason jar terrariums are a popular and easy way to bring a touch of greenery into your home or office. You can create a beautiful mini garden with the right materials and plants in a glass jar.
Here are some ideas for plants suitable for a mason jar terrarium.
- Layer of Pebbles: The first layer of a mason jar terrarium is a layer of pebbles or rocks. This layer is important because it helps with drainage and prevents water from accumulating at the bottom of the jar. You can use any type of pebbles or rocks, but choosing small ones that will fit in the jar is best.
- Charcoal: After the layer of pebbles, add a layer of activated charcoal. This layer helps to filter the water and keep the terrarium clean and fresh.
- Layer of Potting Soil: The next layer is a layer of potting soil. This layer provides the plants with the nutrients they need to grow.
- Ferns: Ferns are a great choice for a mason jar terrarium because they thrive in high-humidity environments. They also come in various shapes and sizes, so you can choose the one that best fits your terrarium.
- Layer of Moss: A layer of moss can be added on top of the potting soil. Moss adds a beautiful green color to the terrarium and helps retain moisture.
- Closed Terrariums: If you want to create a closed terrarium, you can choose plants that thrive in high humidity, such as ferns, mosses, and air plants. A closed terrarium is a self-contained environment and requires very little maintenance.
- Gravel: In addition to pebbles, you can also use gravel as a drainage layer. Gravel comes in various colors and sizes, so you can choose the one that best fits your terrarium.
- Green Thumbs: If you have a green thumb, you can experiment with different types of plants in your mason jar terrarium. Some other suitable plants include succulents, cacti, and small herbs.
Final Words
Making a mason jar terrarium is a fun and creative project anyone can do! After reading the discussion above, we hope you have gathered all information about how to make a mason jar terrarium.
With the help of this guide, you will be able to construct your terrarium successfully. Start by choosing a jar, adding soil, rocks, and plants, and then water and moss. Be sure to use plants that will thrive in your created environment.